Introduction
WCF Security is definitely not something that can be picked up easily. It isn’t plug and play or something that can simply be turned on or off; and it most definitely is not easy to understand or programmer friendly. I have been banging my head against a wall trying to understand WCF Security for a long time now, with many unsuccessful attempts repeatedly. I am stubborn though and keep coming back to it whether I get a black eye or not. However when something becomes necessary to understand – the urgency goes up, it doesn’t matter how many times you get a black eye – you figure it out. Sink or swim. In other words I struggled with this topic a lot and I finally figured it out. My first mistake was I was going about the topic all wrong. You need to ask yourself a very important question when you are working on Service Security in general – what are you trying to achieve? Do you want authentication, authorization or both?
Definitions
To make sure we are all on the same page, you have to make sure you know what the difference is between authentication and authorization.
- Authorization – giving permission or authority. Are you allowed to be here? Yes, then welcome – No, then hit the road jack, come back when you are given permission.
- Authentication – confirming the truth of an attribute of a single piece of data or entity. Are you who you say you are? Let’s check your username and password. If it checks out, then come on in. If it does not check out, halt – you are not allowed any further!
Let’s work with Authorization
This may be a bit much to take in at first, but just keep an open mind and read carefully and try your best to understand along the way. There are several steps involved with getting Authorization to work and this requires cooperation from the client and from the server (which is why working with third parties would be difficult). Those steps are:
- Build your Custom Message Header – these message headers are NOT to be confused with Http Headers, they are specifically SOAP message headers when using the basicHttpBinding or wsHttpBinding. This introduces a problem that I will explain below.
- Build your Message Inspectors
- Dispatch Message Inspector: IDispatchMessageInspector
- Client Message Inspector: IClientMessageInspector
- Build your Custom Behavior
- Behavior Attribute itself – wcf endpoint behavior definition
- Behavior Extension Element – required for app/web config, let’s assume web.config moving forward
- Modify your server side web.config
- Modify your client side web.config
This may seem like a lot of steps, but really it isn’t. The good news is that once you implement the code the first time, all you have to do in the future is modify your configs – which is pretty simple as well. I strongly recommend putting all of this code into a single project. This project will be referenced by both the server and client sides. That way you are 100% ensured uniformity, especially if you have to modify the code – there is absolutely no reason to implement this code more than once.
Build your Custom Message Header
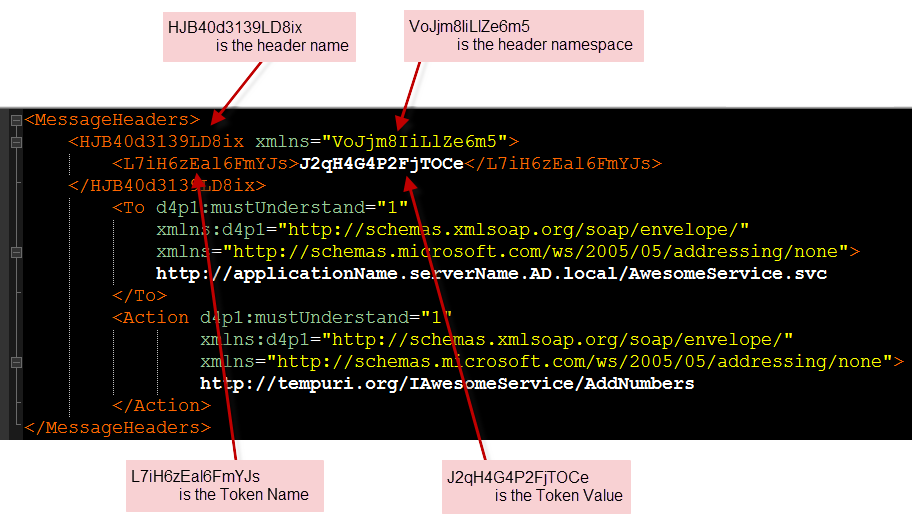
- Header Name – the name of the message header
- Header Namespace – the namespace of the message header
- Token Name – the name of our authorization node
- Token Value – the value of the authorization node
- I did not want to hardcode any strings into this class so it will remain fully configurable from the web.config
- Just in case the values of the aforementioned properties became compromised, they could be changed immediately without having to recompile anything
I am extra paranoid about people getting values through packet sniffers and other means, so I figured instead of making the header properties and values human readable why not make them all resemble passwords? Here is an example of a Message Header:
 |
| Example of a SOAP message’s message headers section containing a custom message header |
Please note that the Token Name and Value are properties I came up with – this is not required and it can be named anything else, but for my design I called it a Token. This token is the contents of the message. More contents could have been added, but since this has to be checked twice and for every message, keeping it small is better.
Code: AuthorizationHeader.cs
Build your Message Inspectors
- Inject the authorization Header into each outgoing message. This is done by the Client message inspector using the “BeforeSendRequest(…)” method.
- Inspect each incoming message to make sure it contains an Authorization Header with the 4 appropriate aforementioned values. This is done by the Dispatch (Server) message inspector using the “AfterReceivedRequest(…)” method. If those values exist then the requester is Authenticated, if those values do not exist or do not match, then the requester is not authenticated and they will be issued an UnauthorizedAccessException.
| Example of an end to end transaction involving a message inspector |
For the following three sections I recommend looking at the code while reading along:
AuthorizationMessageInspector.cs
Dispatch Message Inspector
- Is the expected Authorization Header present?
- Can the header be deserialized from XML into an AuthorizationHeader object?
- Does the Authorization Token match what the server is expecting?
Message Inspectors and REST
One of the problems I ran into here was that I was trying to satisfy REST calls and SOAP calls. This was very tricky and at that point it was very clear why WCF is not the greatest platform for REST. The message inspector and header messages are geared towards usage with non webHttpBinding. In other words – how do you append a header messages in a REST call? Let me be clear – I am not talking about http headers, I am talking about Message Headers. In the context of the basicHttpBinding or wsHttpBinding it would be a SOAP header. You can’t use the Client Message Inspector for REST, as it is only triggered in a server side context, for bindings other than webHttpBinding it seems.
Therefore in order to combat this problem, I came up with a not so wonderful way of handling it. I cannot condone what I did, but it works. However once again, I won’t say this is the right way to do it – it is just a work around. In order to get this to work with REST I had to use the Query String in an unsavoury manor. I came up with a arbitrary scheme for passing the AuthorizationHeader information over to the message inspector and it looks like this:
…AwesomeService.svc/REST/AddNumbers?x=1&y=2&HJB40d3139LD8ix=VoJjm8IiLlZe6m5&L7iH6zEal6FmYJs=J2qH4G4P2FjTOCe
So basically the scheme I made up is: ?AuthorizationHeaderName=AuthorizationHeaderNameSpace&AuthorizationToken=AuthorizationTokenValue
This is picked up by the message inspector first, if it is present then it is evaluated, if not then the SOAP headers are inspected following the same rules as usual.
Client Message Inspector
- Create a new AuthorizationHeader with the appropriate AuthorizationTokenValue
- Add this AuthorizationHeader to the current request’s Headers collection
Build your Custom Behavior
Behavior Attribute
- ApplyClientBehavior – use the client message inspector logic (BeforeSendRequest)
- ApplyDispatchBehavior – use the dispatch message inspector logic (AfterReceiveRequest)
Behavior Extension Element
Server Side Web.Config (Dispatch Message Inspector)
 |
| Click on the image to expand it. Cross reference it with the code and understand what is happening here. |
Client Side Web.Config (Client Message Inspector)
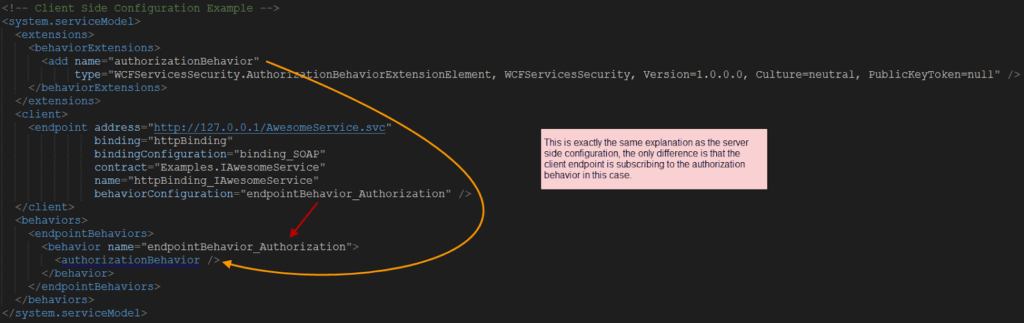 |
| Click on the image to expand it |
App.Config/Web.Config – Configuration
- Application Settings
- Server Side Settings
- Client Side Settings
Breakdown
Credit and Sources
- http://weblogs.asp.net/paolopia/archive/2007/08/23/writing-a-wcf-message-inspector.aspx
- http://weblogs.asp.net/paolopia/archive/2008/02/25/handling-custom-soap-headers-via-wcf-behaviors.aspx
- http://weblogs.asp.net/cibrax/archive/2007/07/24/configsource-attribute-on-system-servicemodel-section.aspx
- https://www.google.com/search?q=define+authorzation
- https://www.google.com/search?q=define+authorzation