Obscure
If you just want the answer go down the section labeled “Fix Instructions”.
I had quite the adventure recently trying to find out why the mullion flap on my French doored refrigerator went slack all of a sudden. As usual I went straight to Google and YouTube to figure it out and thankfully someone had a video up about the problem. However, even though this described perfectly the problem I was experiencing, the solution was not for me. They said a spring broke for them, which it did, but this was not what went wrong for me. A part on my hinge broke and I will explain below the work around to having to buy a new one right away.
Which model does this apply to?
This model as of 03/18/2023 is 10 years old. I am not clear on what revisions may have happened since I bought this model which explains why my spring is completely different from the one in the video linked above.
| M/N | RF260BEAESR |
| BOM | RF260BEAESR/AA |
| Manufacturer Date | June 2013 |
What the hell is a mullion flap?
It’s that vertical bar that is connected to the left-hand door. It’s what creates a complete seal for the right-hand door. It looks like this:

What broke then?
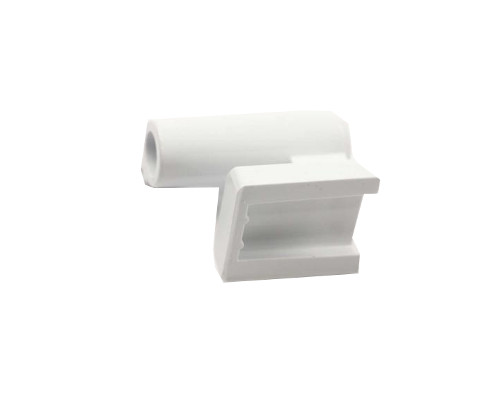
In some cases apparently the spring can break. In my case the “French Door Hinge” didn’t break exactly, but the little loop that holds one end of the spring arm broke. It appears that either the grease dried up completely or there never was grease and the spring arm sawed through the plastic over a ten year period. The point is this is a wear and tear part and ten years is an excellent run for a piece of plastic that is a few millimeters thick and exercised repeatedly every single day multiple times a day sometimes. Perspective.

You can see here in context where the broken hinge comes from and where the spring connects to. The spring is not in view here I removed it.

A great discovery saves the day
At this point I was a little upset because obviously I noticed that the spring I bought and the spring I have are two different things. Also my spring wasn’t broken so it was all moot. I started thinking about 3D printing a new hinge, but this is a complicated part. Then I realized while looking up and down the mullion flap that the BOTTOM hinge was IDENTICAL to the TOP hinge! This was great because I already took the damn thing off the fridge and yanked it apart. I didn’t want to have to go back to square one to find the right part for the job or to 3D print anything frankly.
Fix instructions
To be absolutely clear about how to fix this problem do the following:
- Remove the mullion flap from the left-hand fridge door.
- You have to unscrew the two screws in the middle.
- Behind that part is a wire harness you need to disconnect.
- Push the whole assembly up to dislodge it from the fridge door.
- At this point lay it on a sturdy work surface.
- Locate the little notches located along the whole flap.
- Using a flat head screw driver – carefully unsnap each part. Some of them are stubborn. You are going to warp the plastic a little, it’s unavoidable unfortunately.
- Toward the top you will find the spring attached to the hinge (maybe?), but it is hidden under some Styrofoam. Do not discard or deform the Styrofoam, it is literally insulation you need to keep the cold air inside of your fridge.
- Remove the spring and put it somewhere safe.
- Remove the retaining clips that hold the hinges in on both top and bottom.
- Clean everything that needs to be cleaned. Use a mild soap to break down grease.
- Dry everything.
- Grease the hinge bodies and movement points where the spring makes contact with the plastic. This should reduce the amount of friction produced that chewed through the plastic to begin with.
- Take the hinge you removed from the bottom and move it to the top. This is the good hinge.
- Take the broken hinge you removed from the top and move it to the bottom. This is the broken hinge and it doesn’t matter if it is broken because there is no spring located at the bottom.
- OPTIONAL – Put a dab of hot glue directly above the spring arm on the flap body to stop it from slipping out. Smear it flatter if needed with a flathead screw driver so that it doesn’t interfere with the insulation that needs to go back in.
- Reconstruct the mullion flap. Snapping each part together, it can be stubborn going back together too.
- Reconnect the wire harness of the mullion flap.
- Reattached the mullion flap by securing the hinges on their slides simultaneously.
- Screw the center part back on, be careful not to overtighten as the plastic backing is not the strongest and may already be weakened.
- Close the door and be happy that’s over with.


Scroll through the images to see the end result.
Where can I get a new hinge?
This is not an endorsement for these websites, but I did locate the part on these websites along with great imagery.
Part Number: DA61-08305A
https://www.ereplacementparts.com/hingefrench-aw4pccool-p-3526295.html
http://www.genuinereplacementparts.com/samsung-rf260beaesr-aa-french-door-hinge-genuine-oem
If for some reason both of your hinges are broken, then these links may be of some use to you.