I just wanted to share some very basic things that you can do with Visual Studio Macros. This explanation will be valid for both Visual Studio 2008 and Visual Studio 2010, I can’t vouch for anything earlier because I don’t use them (I used to use Visual Studio 2003 a lot up until recently…and I don’t miss it). I think Macros in Visual Studio are an overlooked thing that some people just toss aside as “Why the hell would I need to use this?” well I can give you a few good examples of where it is useful. Mind you though, I am pretty sure I am only using like an 1/18th of Macros usefulness.
Why would I want to use Macros?
You would want to use Macros to save yourself time and frustration. Do you have any repetitive text that you have to type over and over? Especially for those times where you have to add a new argument to a bunch of methods or if you want to add a comments stub to something. If you answered yes, then you might want to start using Macros to help you do your repetitive typing for you.
Where do I begin?
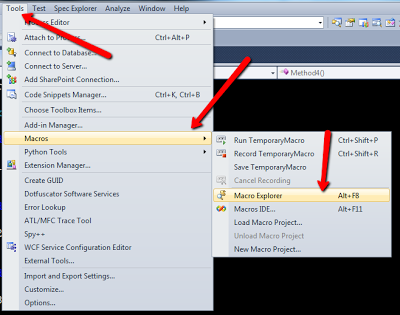
- You want to start by opening the Macro Explorer which is located in: Tools > Macros > Macro Explorer, Or you can press Alt + F8.
On a side note, if you get an error while doing this, don’t worry just press the OK button. It is just complaining about a file that probably isn’t there, which isn’t a problem because it is going to recreate it for you anyhow.
- By default you will see Module1, which might as well be labeled Module1.vb because you will be building your macros in VB. In order to create a new Macro right click on Module1 and select New Macro.
- This action will open up what resembles another Visual Studio window that looks more like Visual Studio 2008 than anything in my opinion. This is where you will build your macros. As you can see you created a new Macro called “Macro1” which is really a method that has a return type of void (VB Terms: You created a Sub Procedure).
- For this first exercise we will stick with the infamous hello world example. This is what your Macro1 should look like:
Sub Macro1() DTE.ActiveDocument.Selection.Text = "//Hello World!" End Sub - When you are finished copying that in, save it, lower or close the window and go to a test space. Your test space can be ANYTHING, just any file where you can type text.
- Place your cursor on the document
- Double click on Macro1 in the Macro Explorer and as you can see it placed the “//Hello World!” text right where your cursor was placed in the text editor. Now take this concept and apply it to anything you have to type too often.
Comment Stub Example
Here is a simple example that I use often:
'This function returns my comment stub base. My Initials are EHH.
Function CommentBase() As String
    Return "'EHH - " & DateTime.Today.ToString("MM/dd/yyyy") & " - "
End Function
'Here is my Macro for placing my comment base
Sub ChangeComment()
    DTE.ActiveDocument.Selection.Text = CommentBase()
End Sub
Console Application Main Method Pause
I need this snippet when ever write console applications for testing or for anything else quick and dirty. Either way I always need this snippet.
Sub PrintConsolePause()
    DTE.ActiveDocument.Selection.NewLine()
    DTE.ActiveDocument.Selection.Text = "//DO NOT DELETE THIS LINE"
    DTE.ActiveDocument.Selection.NewLine()
    DTE.ActiveDocument.Selection.Text = "Console.WriteLine(""Press Any Key to Continue..."");"
    DTE.ActiveDocument.Selection.NewLine()
    DTE.ActiveDocument.Selection.Text = "Console.ReadLine();"
End Sub
So those are the most basic examples of Macros and at this point that is all I am interested in knowing so that is all I have to share. In order to edit or delete a Macro just use the Macro Explorer window and right click on the individual Macros to maintain them. You can pretty much do everything from the Macro Editor Window.


